The expansion of blockchain technology has created many high-performance, yet separate, networks. Avail is transforming this fragmented space by creating a unified backbone for different blockchains and rollups to connect. This new infrastructure is built and secured by its community members. You can now join this effort by staking your AVAIL tokens. This manual explains the complete process, helping you put your tokens to work and become part of the movement.
Key Takeaways
- Avail provides two staking methods: direct nomination or joining a nomination pool.
- A stake begins earning rewards after an activation period of one to two eras.
- Unstaking your tokens requires a 28-day waiting period before they can be used again.
- Selecting reliable validators is the best way to avoid slashing penalties that can reduce your stake.
Understanding Avail
In today's blockchain world, many networks exist in isolation, creating a fragmented landscape. Avail is designed to fix this by building a unified, trust-minimized infrastructure where different blockchains and rollups can communicate and interact effortlessly. This foundational layer is crucial for achieving true scalability and unlocking new, complex applications.
The security of this entire system relies on its Nominated Proof of Stake (NPoS) consensus model. Here's how it works in simple terms:
- Validators are the diligent workers of the network. They run the hardware that processes transactions, produces blocks, and maintains the blockchain's integrity.
- Nominators (that's you!) are the backers. By staking your AVAIL, you "nominate" or endorse the validators you believe are trustworthy and reliable.
Your stake acts as a vote of confidence, and in return for helping secure the network, you receive a share of the rewards earned by your chosen validators.
Preparing to Stake: Your Checklist
Before you start, some key preparations are needed. This checklist covers choosing your method, selecting validators, and setting up your funds.
The first step is deciding how you will stake.
- Direct Nomination: This is for experienced stakers who want to manually select and rank validators. It requires a minimum of 1,000 AVAIL.
- Nomination Pools: This is a simpler option for beginners and passive stakers. You delegate tokens to a pool operator who handles validator selection for a small fee. The minimum to join is 100 AVAIL.
If you select direct nomination, picking your validators is the most important step. A good validator should have:
- A strong track record and high uptime.
- Low commission fees to increase your returns.
- A smaller network share to support the network's decentralization.
- A trusted reputation, such as being a Staking Rewards Verified Provider.
Finally, you must prepare your wallet and funds.
- You need a compatible wallet to begin, like SubWallet.
- Make sure your wallet has enough AVAIL to cover your chosen stake amount.
- Keep a small amount of AVAIL tokens to pay for transaction fees.
How to Set Up SubWallet
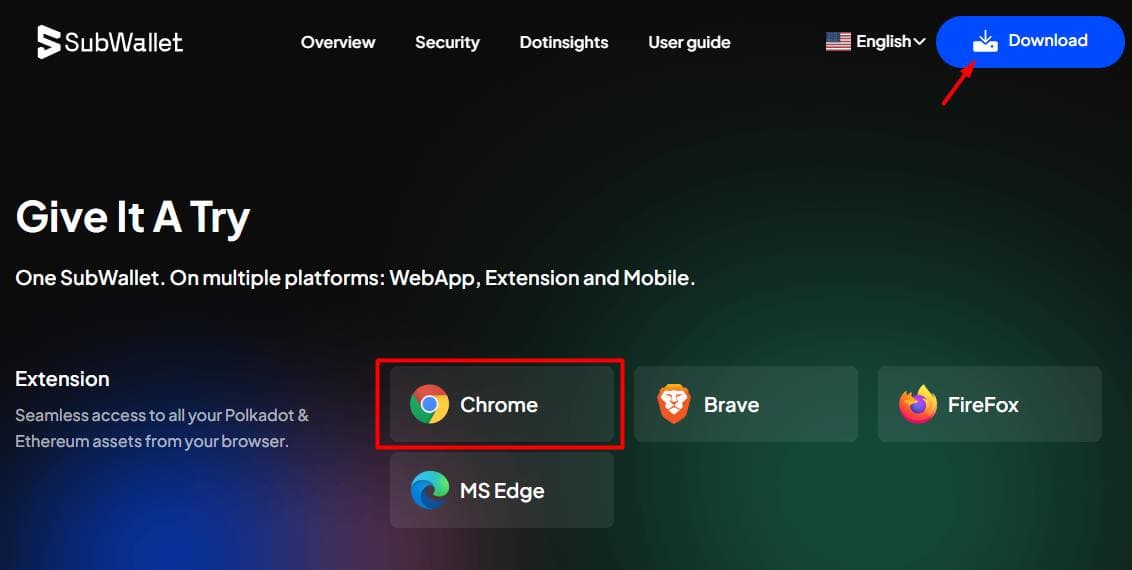
To set up your wallet, begin by visiting the SubWallet website and select the browser you use, then click the "Download" button.
Once you have the extension, you'll be guided through the setup process.

-
Choose Setup Option
First, select "Create a new account" to make a wallet from scratch. -
Agree to Terms
You will need to read and agree to the Terms of Use before you can continue. -
Create a Password
Next, create a password that will be used to unlock your SubWallet on your current browser. This password should be at least 8 characters and include letters and numbers. -
Acknowledge Seed Phrase Safety
Before you see your seed phrase, you must acknowledge the risks. You will need to check boxes confirming you understand that SubWallet cannot help you recover your account if your seed phrase is lost and that you must write it down in the correct order and store it in a secure offline location. -
Secure Your Seed Phrase
Now, your unique seed phrase will be displayed. This is the most important step. Write this phrase down in the correct order and store it somewhere safe where it cannot be accessed by others. -
Confirm and Name Your Account
After confirming you have saved your seed phrase, you can name your account. Once you confirm the name, the setup is complete, and you can go to your new wallet's home screen.
After your wallet is ready, transfer your AVAIL tokens to it from an exchange or another wallet. Remember to send more than the minimum staking amount to cover transaction fees. Keeping 1-3 AVAIL liquid is a good practice.
How to Direct Nominate (The Advanced Path)
This path is for those who want to be more hands-on with their staking. It might seem advanced, but it just means you get to pick your own team of validators to support. Let's walk through it step-by-step.
1. Look Around the Staking Dashboard
First, head over to the staking dashboard and connect your SubWallet.

Before you do anything else, it's a great idea to get familiar with the validators. You can click on the "Validators" tab on the left. This is like a catalog of all the active network guardians. You can see their performance and other details, which will help you make a good choice later. Don't worry, you don't have to pick just yet - this is just for looking!

2. Start Your Nomination
When you're ready, click on the "Nominate" tab in the sidebar. You'll see a big blue button that says "Start Nominating" - If you have at least 1,000 AVAIL tokens, click on it to get started.

3. Decide Where Your Rewards Go
The first choice you'll make is what to do with your future rewards. You have three simple options:
- Compound: This mode automatically adds your rewards back into your staked amount, helping your stake grow over time.
- To Your Account: This option sends your rewards directly to your wallet as spendable funds.
- To Another Account: If you want your rewards sent to a different wallet, you can specify that here.
Pick the one that works best for you and click "Continue".
4. Choose Your Validators
Now for the main event: picking your team of up to 16 validators!

The dashboard gives you a few ways to do this, from easiest to most hands-on:
- Optimal selection: Let the dashboard pick a list of reliable validators for you. This is a safe and easy choice if you're unsure.
- Active Low Commission: This will give you a list of good validators who charge lower fees, which can mean more rewards for you.
- Manual Selection: If you did your own research and have specific validators in mind, like you can pick them yourself here.
After selecting a validator, click "Continue".
5. Set Your Stake and You're Done!
Next, you'll enter how much AVAIL you want to bond, or stake. You can type in the amount or click "Max" to stake all your available tokens. Remember, the minimum for direct nomination is 1,000 AVAIL. Click "Continue" when you are ready.

6. Review the Summary and Confirm
You're at the final step! A summary screen will appear, showing all the details of your nomination: your Payout Destination, the number of Validators you're nominating, and your total Bond Amount.
It's your final opportunity to review everything. If it all looks correct, click "Start Nominating" and approve the final transaction in your wallet. And that's it!

How to Join Avail Nomination Pool (The User-Friendly Path)
Joining a Nomination Pool is the simplest and most recommended path for newcomers to start staking. It’s a great way to contribute and earn rewards without needing to perform active management. Here’s how to do it.
1. Go to the Pools Section
First, head to the staking dashboard and click on the "Pools" tab in the left sidebar. On this screen, you’ll see some general information about the pools and you as a member. When you’re ready to find a pool to join, click the blue "Join Pool" button.

2. Choose a Pool
After clicking the button, you'll be taken to a list of all available pools. This is your chance to look through them and choose one you'd like to join. You can click on any pool to see its recent performance and other details.

3. Join Your Chosen Pool
Once you've selected a pool, you'll see the "Join Pool" screen.

Here's what to do:
- In the "Bond AVAIL" box, type in the amount of AVAIL you wish to stake. Remember, the minimum to join a pool is 100 AVAIL.
- Decide what happens to your rewards. "Allow Compound" is a popular choice, it allows anyone to initiate the transaction that re-stakes your rewards, helping your total grow. You can also choose to have them sent to your wallet ("Allow Withdraw") or manage them yourself ("Permissioned").
- When you're happy with your settings, click the final "Join Pool" button at the bottom and approve the transaction in your wallet.
You've successfully joined a nomination pool!
Managing Your Stake: Rewards, Risks, and Best Practices
Staking is an ongoing process, whether you nominate directly or join a pool. Once your stake goes live, it's best you understand the lifecycle of your investment, risks that come with it and tuning your strategy with time.
Your rewards will accumulate and must be periodically claimed, keeping in mind that a new stake only becomes active and starts earning in the eras following the one in which it was placed (1 era ~24 hours). Using the Avail Staking Dashboard works best at managing this, you can view your rewards in real time and track the performance of your validators or nomination pool.
The primary risk in staking is slashing, a penalty for validator misbehavior where any loss is distributed proportionally, whether among all of a validator's direct nominators or across all members of a staking pool. Protection of your assets comes with proper choice and diversification. Diversification is possible by selecting several good validators or staking with a variety of nomination pools. When you decide to stop staking, you must begin the "unbonding" process, which includes a 28-day cooldown period where your tokens are locked. For this reason, you should only stake an amount you are comfortable having locked for that period.
Whether you select the full control of direct nomination or the simplicity of a nomination pool, the key to a successful experience is based on good research, careful selection of validators or pools, and active monitoring of your stake.
The information provided by DAIC, including but not limited to research, analysis, data, or other content, is offered solely for informational purposes and does not constitute investment advice, financial advice, trading advice, or any other type of advice. DAIC does not recommend the purchase, sale, or holding of any cryptocurrency or other investment.