So, you've heard about IOTA Rebased, and you're interested in staking your IOTA tokens? Great decision! Staking is a fantastic way to actively participate in the IOTA network, help keep it secure, and earn some rewards in the process. It might sound technical, but we're here to show you it's actually pretty easy.
This guide will walk you through staking your IOTA, right from setting up your wallet.
Key Takeaways
- Secure Start: Begin your IOTA journey by setting up the official wallet – we make it easy and safe.
- Dashboard Connection: Learn the quick steps to link your wallet to the IOTA Wallet Dashboard.
- Stake Like a Pro: Follow our easy steps to choose a validator and stake your IOTA.
- Quick & Visual Guide: This tutorial uses clear screenshots to walk you through each essential step.
Step 1: Set Up Your IOTA Wallet
First things first, you'll need the official IOTA Wallet. For the new IOTA Rebased network, this is a user-friendly browser extension wallet. Once you're on the extension page, you'll see an option like "Add to Chrome", click this button. Your browser will ask for permission to add the extension. Confirm this, and it will be installed and usually appear as a small icon in your browser's toolbar.
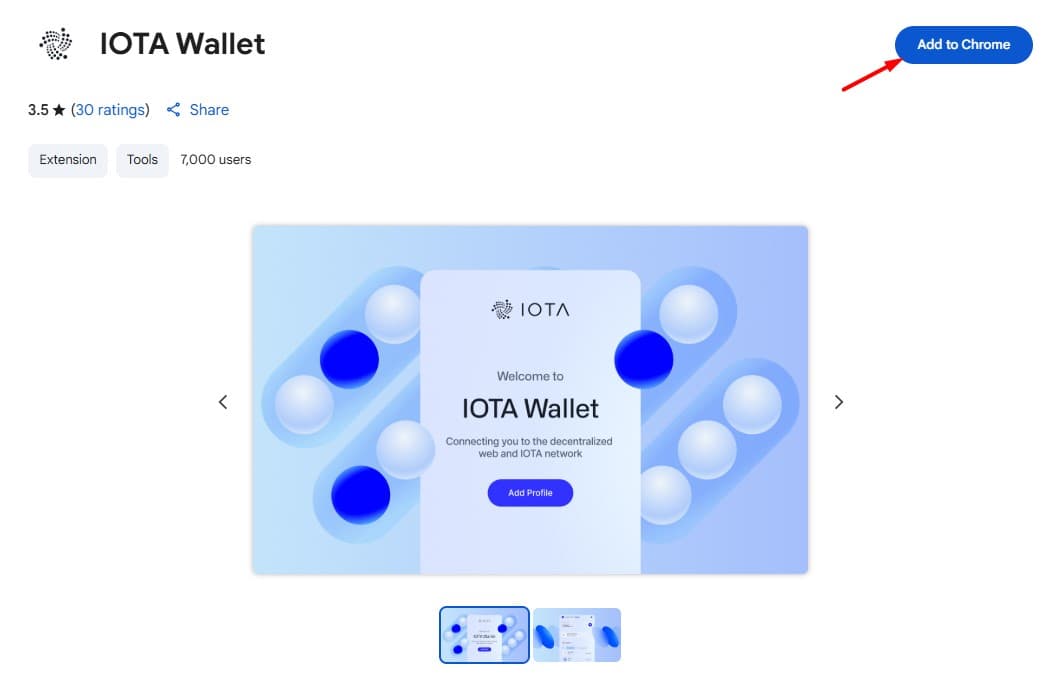
Now that the extension is installed, click on the IOTA Wallet icon in your browser to open it.
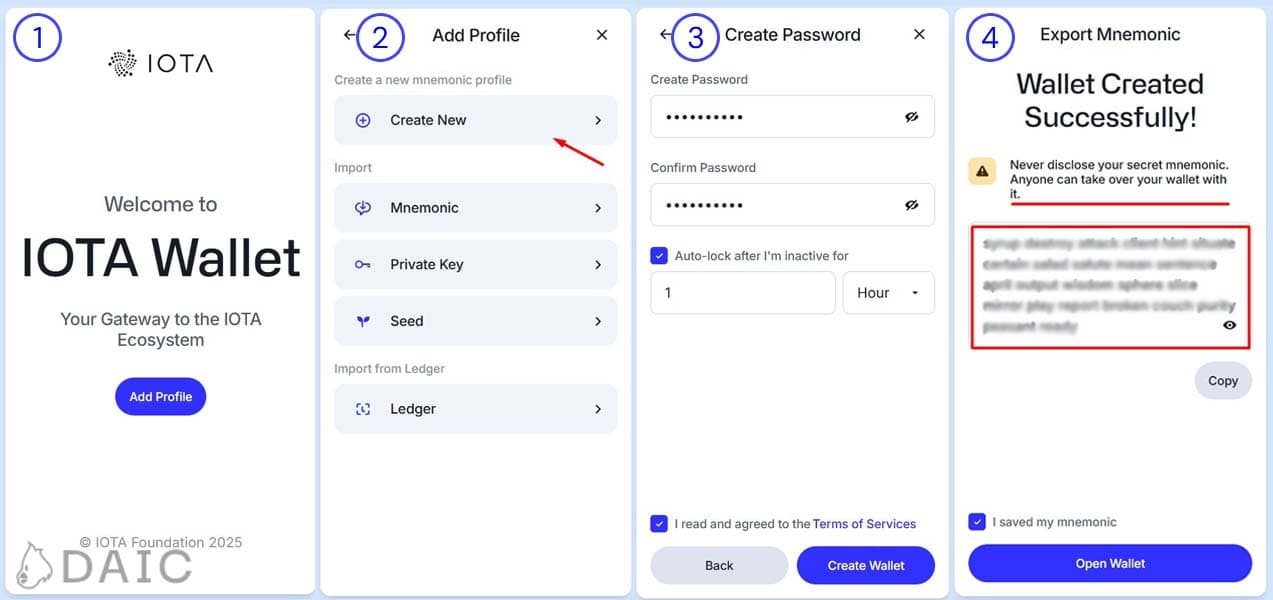
This image shows the four steps of creating a new wallet for better clarity
- When you first open the wallet, you'll be greeted and prompted to "Add Profile."
- For this tutorial, we're going to walk through "Create New" to set up a brand-new wallet from scratch.
However, if you already have an IOTA wallet from before (perhaps an older seed, a mnemonic phrase, or a private key you want to import), or if you use a Ledger hardware wallet, you'll see options like "Mnemonic", "Private Key", "Seed", or "Import from Ledger." You would choose the one that applies to you. For today, let's stick with creating a fresh one!
- Next up, create a strong, unique password for your wallet. You'll need to confirm it, so make sure it's something secure you'll remember! Most wallets also offer an auto-lock feature for added security.
-
The Golden Rule: Secure Your Mnemonic Phrase! This is SUPER important. The wallet will generate a secret "mnemonic phrase" (a series of words). This phrase is the master key to your funds. If you lose it, you lose access to your IOTA. If someone else gets it, they can take your IOTA.
- Write it down carefully.
- Store it in multiple, secure, offline locations.
- Never share it with anyone, ever!
- The wallet will ask you to confirm you've saved it.
Once you've confirmed your mnemonic is safe, your wallet is created! Click "Open Wallet" to proceed.
Step 2: A Quick Tour of Your New Wallet
Once your new IOTA wallet opens, you'll typically land on the main screen. If it's a brand-new wallet, your IOTA balance will naturally show as zero. This main view is where you'll see your overall IOTA balance and have options to "Send" or "Receive" IOTA once you have funds.
At the bottom of the wallet interface, you'll notice a navigation bar with several icons. These are your gateways to different sections of the wallet.
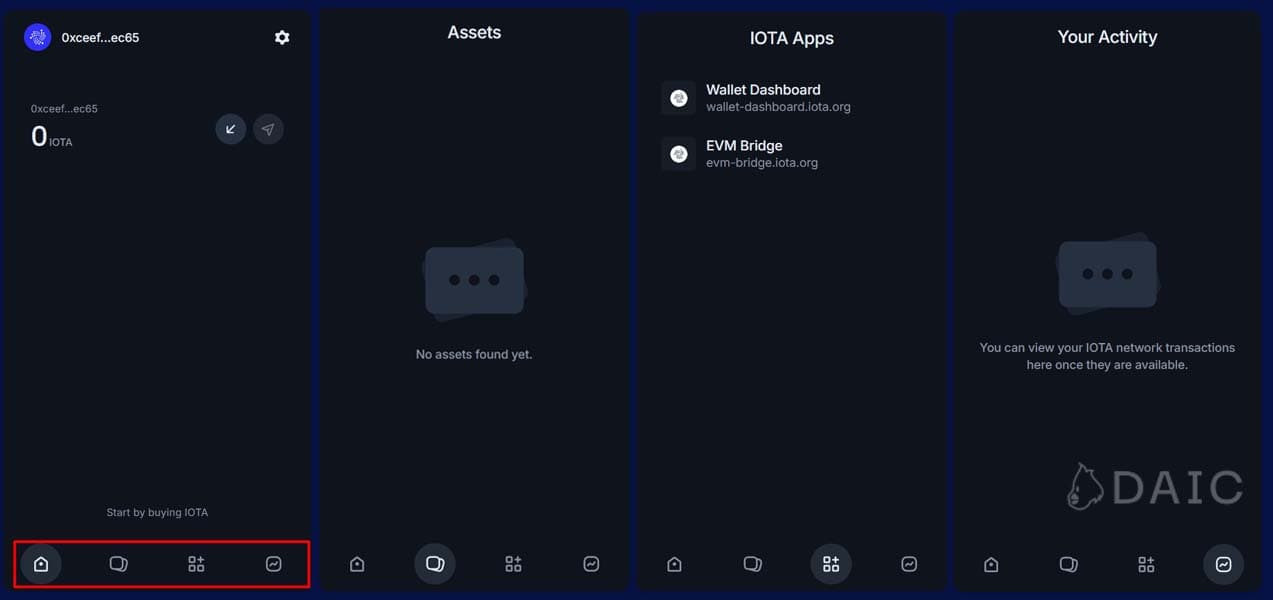
This image displays the four main wallet sections side-by-side for the guide's clarity, with the bottom navigation icon highlighted in each to show which section is being viewed.
- Home/Balance Screen: The default view, showing your main IOTA balance.
- Assets Screen: This is where any other digital assets you own on the IOTA network, like other tokens or NFTs, would be displayed. For a new wallet, this will show "No assets found yet."
- IOTA Apps Screen: The important section lists integrated applications and services you can access directly through your wallet. We'll be heading here for staking!
- Your Activity Screen: This is where your transaction history will appear once you start sending or receiving IOTA.
Alright, your new IOTA wallet is set up and secure! But before we dive into staking, there's one essential step: you'll need some IOTA tokens in your wallet.
Step 3: How to get IOTA tokens
To discover which exchanges list IOTA, you can use popular and comprehensive crypto data websites like CoinMarketCap or CoinGecko. Simply search for "IOTA" on these sites, and look for a "Markets" or "Exchanges" tab. This will show you a list of platforms where IOTA is actively traded. Always choose reputable and well-known exchanges.
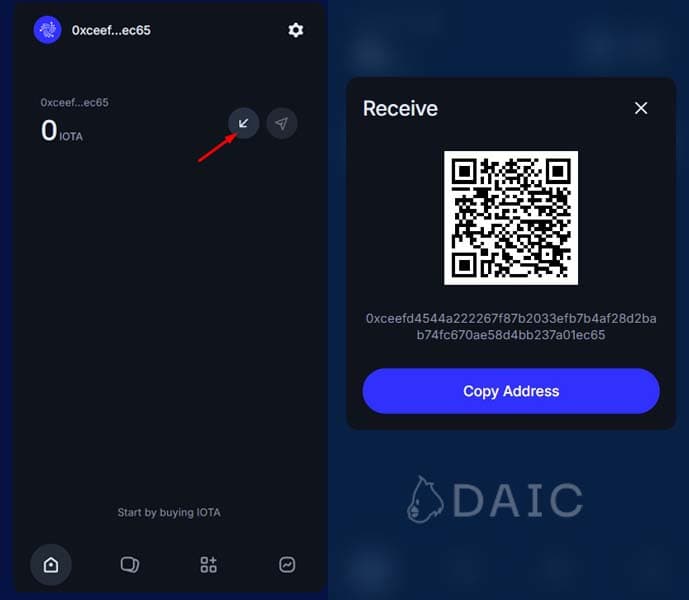
Once you've purchased IOTA on an exchange, you will then need to withdraw those IOTA tokens to your new IOTA Wallet address. Your wallet has a "Receive" function that shows you your unique address – this is where you'll send the tokens from the exchange to.
Safety First! Always double-check (and even triple-check!) addresses when sending crypto. Transactions on the blockchain are irreversible, so a mistake here can mean lost funds.
Make sure you have a comfortable amount of IOTA in your wallet to cover both the amount you want to stake and a little extra for those small transaction fees.
Step 4: Connecting Your Wallet to the Dashboard
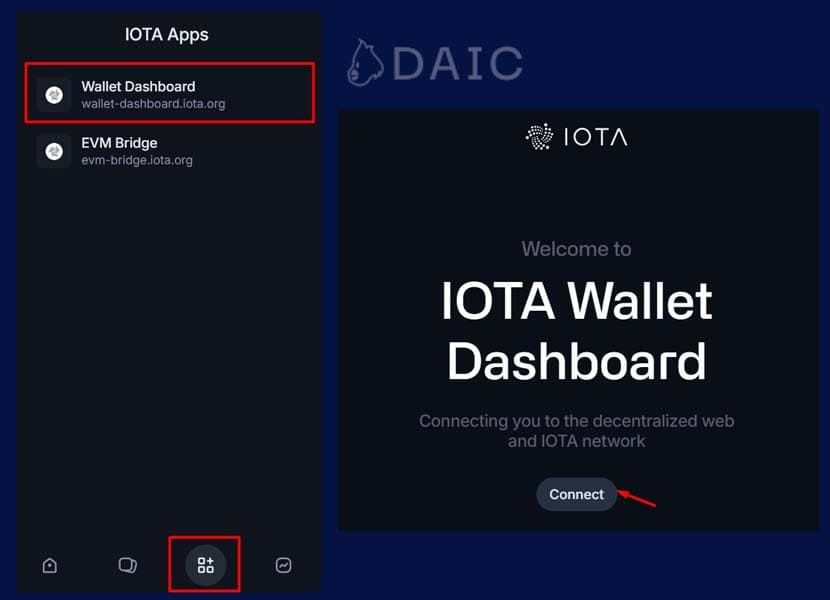
To start your staking journey, you'll need to navigate to the "IOTA Apps" section by tapping or clicking its icon on the bottom navigation bar. Once you're in the "IOTA Apps" screen, look for and select the "Wallet Dashboard." This dashboard is where you'll find the staking features.
Once you select the "Wallet Dashboard" from the IOTA Apps list, it will open a webpage where you will need to connect to your IOTA Wallet extension. Click the "Connect" button on the IOTA Wallet Dashboard welcome screen.
After you choose IOTA Wallet, the wallet extension will then ask you to approve the connection. This is a security step to ensure you're intentionally linking your wallet.
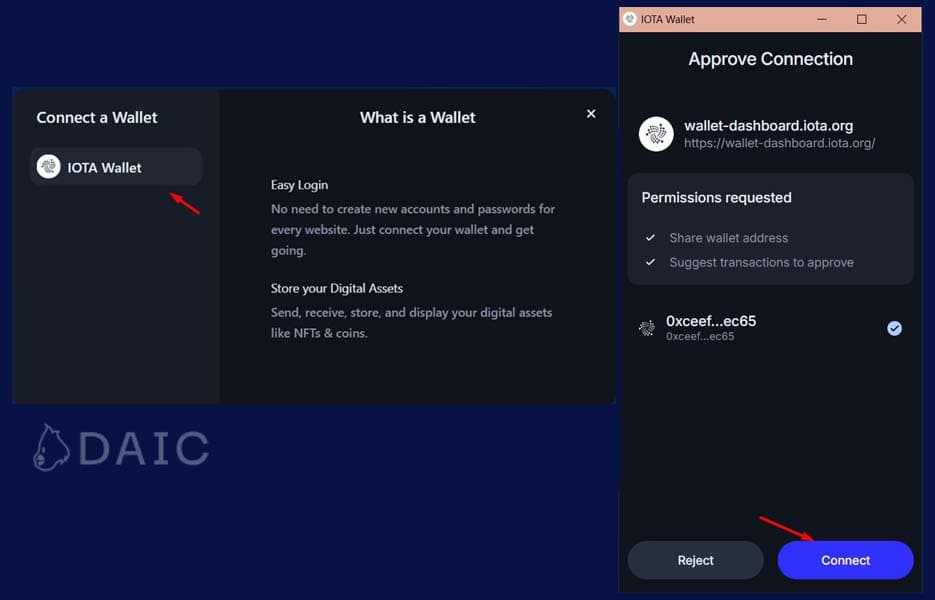
The wallet will show you which site is requesting access (e.g., wallet-dashboard.iota.org) and what permissions it's asking for – typically, to see your wallet address and to suggest transactions for you to approve. Review these permissions and click "Connect" in your wallet to approve.
Step 5: The Main Dashboard & Starting Your Staking
With your wallet successfully connected, you'll land on the main IOTA Wallet Dashboard. Here you'll see your account balance and various options.
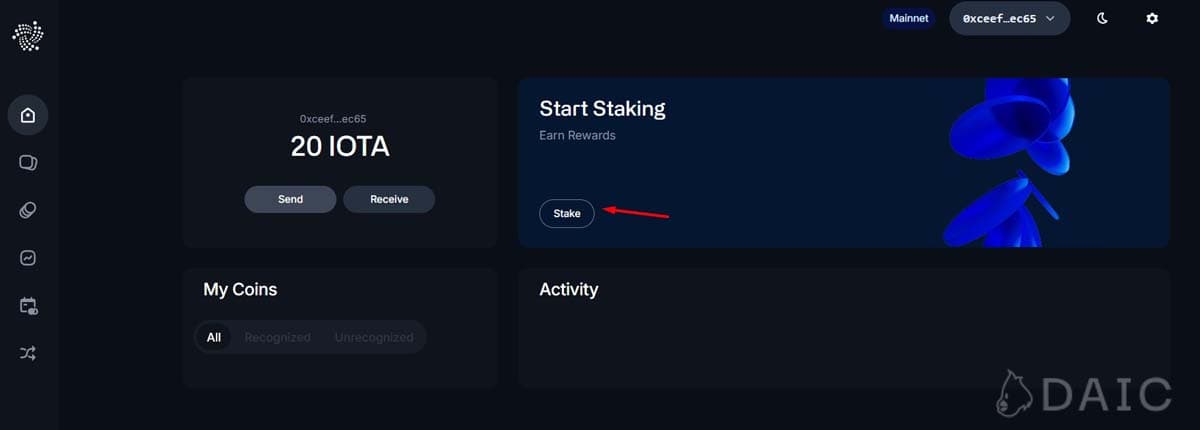
The main thing we're looking for here is the option to begin staking. You should see a clear section "Start Staking" and button "Stake." Give that a click!
- You'll be presented with a list of available validators. You can usually see information like their name, address and estimated APY. Do a little research if you're unsure, or if you have a validator in mind (like Coinage x DAIC, as shown in our example screenshot!), select them from the list.
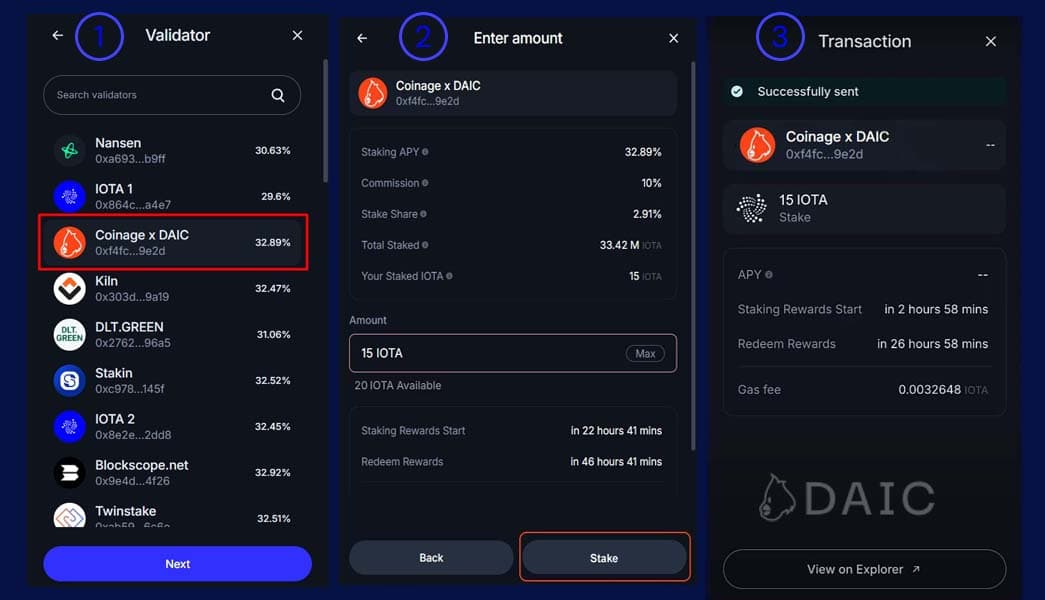
This image shows the three steps of the staking process
- Once you've picked a validator, the next screen will show their details again (APY, commission, total amount already staked with them). You'll see an input field to enter the amount of IOTA you wish to stake. Type in your desired amount and review all the details, including any estimated times for when rewards start accruing.
Important: Always make sure to leave a small amount of IOTA in your wallet unstaked to cover any potential transaction fees (gas fees) for the staking transaction itself and for future transactions like unstaking or sending tokens.
After picking the validator and amount you want, click the "Stake" button. Your wallet will ask for a final confirmation to approve the transaction.
- Success! After you confirm, the staking transaction will be sent to the network. You should see a confirmation screen indicating the transaction was "Successfully sent." This screen often recaps the details: the validator you staked with, the amount staked, and importantly, the gas fee paid for the transaction. There's usually an option to "View on Explorer", which will take you to a block explorer where you can see your transaction officially recorded on the IOTA network.
Remember, your staking rewards will typically begin accruing from the start of the next epoch.
Now that your IOTA tokens are staked, the IOTA Wallet Dashboard is where you'll manage them. You will find sections there to view your current stakes, see the rewards you're earning, and initiate the process to unstake your tokens if you decide to withdraw them or switch validators. Unstaking also involves a transaction and is usually processed at an epoch boundary.
And that's it! You've successfully navigated the process of setting up your IOTA wallet and staking your tokens. Happy staking, and enjoy being part of the IOTA ecosystem!
The information provided by DAIC, including but not limited to research, analysis, data, or other content, is offered solely for informational purposes and does not constitute investment advice, financial advice, trading advice, or any other type of advice. DAIC does not recommend the purchase, sale, or holding of any cryptocurrency or other investment.